iSCSI
Configura un escenario con vagrant o similar que incluya varias máquinas que permita realizar la configuración de un servidor iSCSI y dos clientes (uno linux y otro windows). Explica de forma detallada en la tarea los pasos realizados.
- Crea un target con una LUN y conéctala a un cliente GNU/Linux. Explica cómo escaneas desde el cliente buscando los targets disponibles y utiliza la unidad lógica proporcionada, formateándola si es necesario y montándola.
- Utiliza systemd mount para que el target se monte automáticamente al arrancar el cliente
- Crea un target con 2 LUN y autenticación por CHAP y conéctala a un cliente windows. Explica cómo se escanea la red en windows y cómo se utilizan las unidades nuevas (formateándolas con NTFS)
Nota: Es posible realizar esta tarea en un entorno virtual y corregirlo en clase o alternativamente montar un playbook con ansible que configure todo el escenario de forma automática y permita corregirlo a distancia montándolo desde cero.
Para esta practica utilizaremos el siguiente fichero de configuración de vagrant.
Desde el lado del Servidor
Instalaremos tgt que es una herramienta que nos hace poder utilizar iSCSI(configurar targets para iSCSI):
vagrant@server:~$ sudo apt install tgtUna vez instalada daremos comienzo a la creación del target para debian, para crear el target permanente(que no desaparezca tras un reinicio) deberemos de crear un archivo de configuración del mismo:
vagrant@server:~$ sudo nano /etc/tgt/conf.d/target1.conf

<target iqn.2021-01-target1>
    backing-store /dev/sdb
</target>
Lo realizaremos de un solo LUN(Que quiere decir un solo disco), tras ello reiniciaremos el servicio:
vagrant@server:~$ sudo systemctl restart tgtPodremos ver la información del target creado:
vagrant@server:~$ sudo tgtadm --mode target --op show
Target 1: iqn.2021-01-target1
    System information:
        Driver: iscsi
        State: ready
    I_T nexus information:
    LUN information:
        LUN: 0
            Type: controller
            SCSI ID: IET     00010000
            SCSI SN: beaf10
            Size: 0 MB, Block size: 1
            Online: Yes
            Removable media: No
            Prevent removal: No
            Readonly: No
            SWP: No
            Thin-provisioning: No
            Backing store type: null
            Backing store path: None
            Backing store flags:
        LUN: 1
            Type: disk
            SCSI ID: IET     00010001
            SCSI SN: beaf11
            Size: 1074 MB, Block size: 512
            Online: Yes
            Removable media: No
            Prevent removal: No
            Readonly: No
            SWP: No
            Thin-provisioning: No
            Backing store type: rdwr
            Backing store path: /dev/sdb
            Backing store flags:
    Account information:
    ACL information:
        ALL
Desde el lado del Cliente (debian)
Deberemos instalar el paquete open-iscsi para que pueda realizar búsquedas de targets desde el cliente:
vagrant@cliente:~$ sudo apt install open-iscsi
#Realizamos una busqueda de targets disponibles:
vagrant@cliente:~$ sudo iscsiadm --mode discovery --type sendtargets --portal 192.168.100.1
192.168.100.1:3260,1 iqn.2021-01-target1
#Conectamos al target encontrado(en este caso el nuestro).
vagrant@cliente:~$ sudo iscsiadm --mode node -T iqn.2021-01-target1 --portal 192.168.100.1 -l
Logging in to [iface: default, target: iqn.2021-01-target1, portal: 192.168.100.1,3260] (multiple)
Login to [iface: default, target: iqn.2021-01-target1, portal: 192.168.100.1,3260] successful.
Podemos comprobar la conexión con dicho target de la siguiente forma:
vagrant@cliente:~$ sudo journalctl -k -f
-- Logs begin at Wed 2021-06-02 16:16:45 UTC. --
Jun 02 16:37:41 cliente kernel: scsi 1:0:0:0: RAID              IET      Controller       0001 PQ: 0 ANSI: 5
Jun 02 16:37:41 cliente kernel: scsi 1:0:0:0: Attached scsi generic sg1 type 12
Jun 02 16:37:41 cliente kernel: scsi 1:0:0:1: Direct-Access     IET      VIRTUAL-DISK     0001 PQ: 0 ANSI: 5
Jun 02 16:37:41 cliente kernel: sd 1:0:0:1: Attached scsi generic sg2 type 0
Jun 02 16:37:41 cliente kernel: sd 1:0:0:1: Power-on or device reset occurred
Jun 02 16:37:41 cliente kernel: sd 1:0:0:1: [sdb] 2097152 512-byte logical blocks: (1.07 GB/1.00 GiB)
Jun 02 16:37:41 cliente kernel: sd 1:0:0:1: [sdb] Write Protect is off
Jun 02 16:37:41 cliente kernel: sd 1:0:0:1: [sdb] Mode Sense: 69 00 10 08
Jun 02 16:37:41 cliente kernel: sd 1:0:0:1: [sdb] Write cache: enabled, read cache: enabled, supports DPO and FUA
Jun 02 16:37:41 cliente kernel: sd 1:0:0:1: [sdb] Attached SCSI disk
Otros
Formateo y uso del target
Podemos hacer uso del nuevo dispositivo como si estuviera en nuestro propio equipo, como formatearlo:
vagrant@cliente:~$ sudo mkfs.ext4 /dev/sdb
mke2fs 1.44.5 (15-Dec-2018)
Creating filesystem with 262144 4k blocks and 65536 inodes
Filesystem UUID: 3a221b23-0abc-4590-9a3d-1e8c369ea47c
Superblock backups stored on blocks:
	32768, 98304, 163840, 229376

Allocating group tables: done
Writing inode tables: done
Creating journal (8192 blocks): done
Writing superblocks and filesystem accounting information: done
Comprobamos:
vagrant@cliente:~$ lsblk -f
NAME   FSTYPE LABEL UUID                                 FSAVAIL FSUSE% MOUNTPOINT
sda
└─sda1 ext4         d3d2a9a3-92f6-4777-bb0f-1d806e57bfec   17.1G     8% /
sdb    ext4         3a221b23-0abc-4590-9a3d-1e8c369ea47c
Podemos montarlo para escribir datos en el:
vagrant@cliente:~$ sudo mount -t ext4 /dev/sdb /mnt/
vagrant@cliente:~$ lsblk -f
NAME   FSTYPE LABEL UUID                                 FSAVAIL FSUSE% MOUNTPOINT
sda
└─sda1 ext4         d3d2a9a3-92f6-4777-bb0f-1d806e57bfec   17.1G     8% /
sdb    ext4         3a221b23-0abc-4590-9a3d-1e8c369ea47c  906.2M     0% /mnt
Ejemplo:
vagrant@cliente:~$ sudo touch /mnt/fichero1
vagrant@cliente:~$ ls /mnt/
fichero1  lost+found
Automontar al inicio
Primero vamos a cargar el target con la siguiente configuración no sin antes desmontarlo:
vagrant@cliente:~$ sudo iscsiadm --mode node -T iqn.2021-01-target1 --portal 192.168.100.1 -u
Logging out of session [sid: 1, target: iqn.2021-01-target1, portal: 192.168.100.1,3260]
Logout of [sid: 1, target: iqn.2021-01-target1, portal: 192.168.100.1,3260] successful.
vagrant@cliente:~$ sudo iscsiadm --mode node -T iqn.2021-01-target1 -o update -n node.startup -v automatic
Nos iremos al fichero /etc/iscsi/iscsid.conf y modificaremos la linea de node.startup = manual por node.startup = automatic:
vagrant@cliente:~$ sudo nano /etc/iscsi/iscsid.conf

node.startup = automatic
Reiniciamos el servicio y vemos como se carga de manera automática:
vagrant@cliente:~$ sudo systemctl restart iscsi.service
vagrant@cliente:~$ lsblk
NAME   MAJ:MIN RM SIZE RO TYPE MOUNTPOINT
sda      8:0    0  20G  0 disk
└─sda1   8:1    0  20G  0 part /
sdb      8:32   0   1G  0 disk
Lo habilitaremos de forma permanente para que se ejecute tras un reincio.
vagrant@cliente:~$ sudo systemctl enable open-iscsi.service
Synchronizing state of open-iscsi.service with SysV service script with /lib/systemd/systemd-sysv-install.
Executing: /lib/systemd/systemd-sysv-install enable open-iscsi
Lo que haremos ahora será crear la unidad de systemd para que se monte automáticamente cuando inicie el sistema, para ello, primero crearemos la carpeta dónde se montarán las unidades iSCSI y acto siguiente crearemos la unidad systemd tipo mount teniendo en cuenta que el nombre que deben de tener tiene que ser igual que el del directorio donde se va a montar y el UUID que tenemos que poner es el del disco del target :
vagrant@cliente:~$ sudo mkdir /media/iSCSI
vagrant@cliente:~$ sudo nano /etc/systemd/system/media-iSCSI-target1.mount

[Unit]
Description=target1
After=open-iscsi.service

[Mount]
What=/dev/disk/by-uuid/3a221b23-0abc-4590-9a3d-1e8c369ea47c
Where=/media/iSCSI/target1
Type=ext4
Options=defaults

[Install]
WantedBy=multi-user.target
Ya sólo nos falta reiniciar los demonios, habilitar la unidad e iniciarla:
vagrant@cliente:~$ daemon-reload
vagrant@cliente:~$ sudo systemctl enable media-iSCSI-target1.mount
Created symlink /etc/systemd/system/multi-user.target.wants/media-iSCSI-target1.mount → /etc/systemd/system/media-iSCSI-target1.mount.
vagrant@cliente:~$ sudo systemctl start media-iSCSI-target1.mount
Comprobamos:
vagrant@cliente:~$ lsblk -f
NAME   FSTYPE LABEL UUID                                 FSAVAIL FSUSE% MOUNTPOINT
sda
└─sda1 ext4         d3d2a9a3-92f6-4777-bb0f-1d806e57bfec   17.1G     8% /
sdb    ext4         3a221b23-0abc-4590-9a3d-1e8c369ea47c  906.2M     0% /media/iSCSI/target1
Creación de target para windows
Realizaremos los mismos pasos que para la configuración anterior, con un nuevo fichero:
vagrant@server:~$ sudo nano /etc/tgt/conf.d/target2.conf

<target iqn.2021-01-target2>
    backing-store /dev/sdc
    backing-store /dev/sdd
    incominguser user franciscomadu123
</target>
Reiniciamos servicio:
sudo systemctl restart tgtComo podemos observar ya disponemos de un nuevo target:
vagrant@server:~$ sudo tgtadm --mode target --op show
Target 1: iqn.2021-01-target1
    System information:
        Driver: iscsi
        State: ready
    I_T nexus information:
    LUN information:
        LUN: 0
            Type: controller
            SCSI ID: IET     00010000
            SCSI SN: beaf10
            Size: 0 MB, Block size: 1
            Online: Yes
            Removable media: No
            Prevent removal: No
            Readonly: No
            SWP: No
            Thin-provisioning: No
            Backing store type: null
            Backing store path: None
            Backing store flags:
        LUN: 1
            Type: disk
            SCSI ID: IET     00010001
            SCSI SN: beaf11
            Size: 1074 MB, Block size: 512
            Online: Yes
            Removable media: No
            Prevent removal: No
            Readonly: No
            SWP: No
            Thin-provisioning: No
            Backing store type: rdwr
            Backing store path: /dev/sdb
            Backing store flags:
    Account information:
    ACL information:
        ALL
Target 2: iqn.2021-01-target2
    System information:
        Driver: iscsi
        State: ready
    I_T nexus information:
    LUN information:
        LUN: 0
            Type: controller
            SCSI ID: IET     00020000
            SCSI SN: beaf20
            Size: 0 MB, Block size: 1
            Online: Yes
            Removable media: No
            Prevent removal: No
            Readonly: No
            SWP: No
            Thin-provisioning: No
            Backing store type: null
            Backing store path: None
            Backing store flags:
        LUN: 1
            Type: disk
            SCSI ID: IET     00020001
            SCSI SN: beaf21
            Size: 1074 MB, Block size: 512
            Online: Yes
            Removable media: No
            Prevent removal: No
            Readonly: No
            SWP: No
            Thin-provisioning: No
            Backing store type: rdwr
            Backing store path: /dev/sdc
            Backing store flags:
        LUN: 2
            Type: disk
            SCSI ID: IET     00020002
            SCSI SN: beaf22
            Size: 1074 MB, Block size: 512
            Online: Yes
            Removable media: No
            Prevent removal: No
            Readonly: No
            SWP: No
            Thin-provisioning: No
            Backing store type: rdwr
            Backing store path: /dev/sdd
            Backing store flags:
    Account information:
        user
    ACL information:
        ALL
Cliente windows
Para conectarnos a nuestro target desde windows deberemos realizar los siguientes pasos:
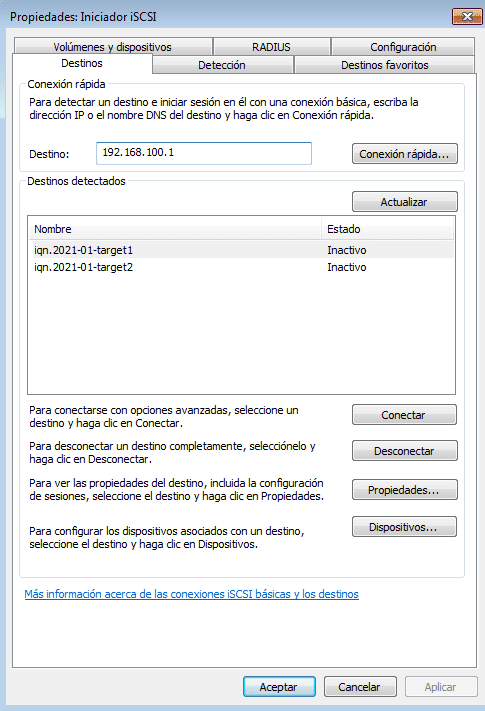
Inicio -> Buscador iSCSI -> Seleccionar "Iniciador iSCSI" -> Introducimos los datos del servidor y actualizamos:
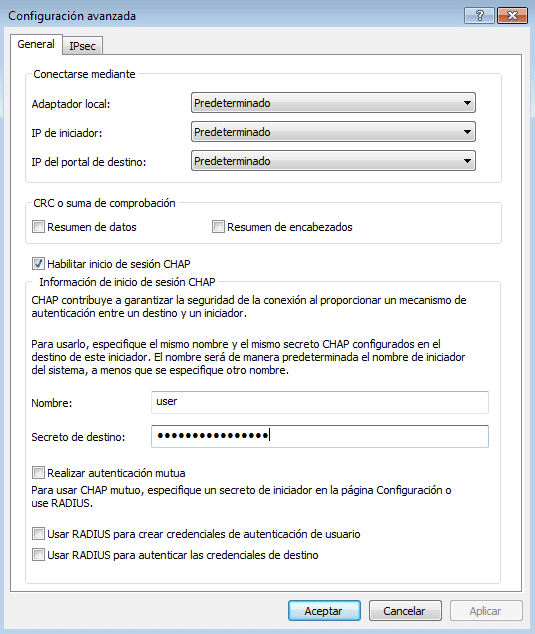
En opciones avanzadas deberemos de introduccir nuestra cuenta(usuario y contraseña) -> Habilitamos el inicio de sesión CHAP para poder introducir el usuario y contraseña:
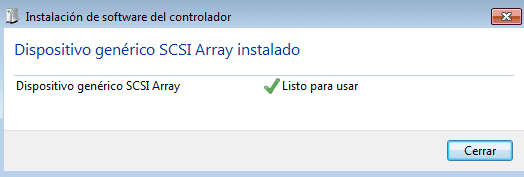
Nos saldra una pantalla confirmando su conexión:

Formateo y uso unidad iSCSI desde windows
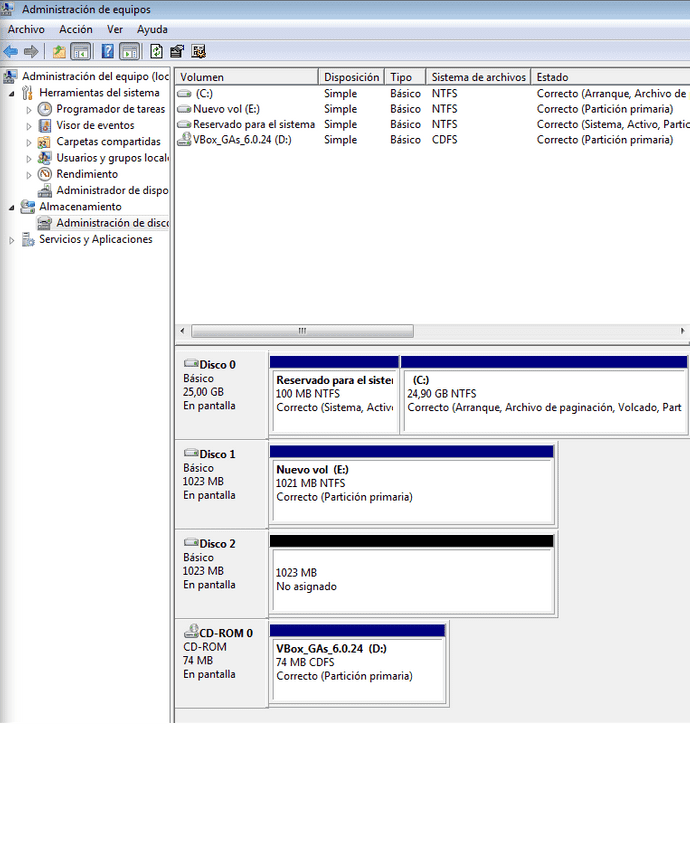
Nos iremos al gestor de disco y comprobaremos que podemos trabajar o formatear el disco perfectamente:

Escrito por Fran Madueño Estudiante de administración de sistemas operativos
(Dos Hermanas, Sevilla).


